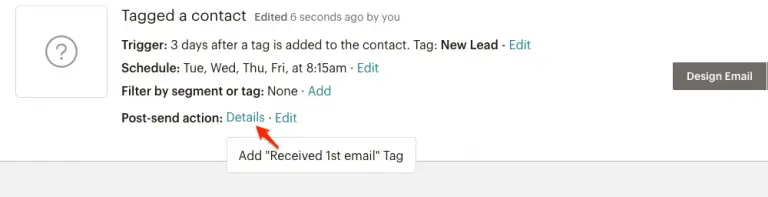
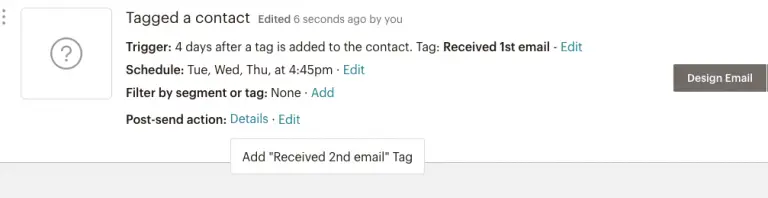
How to send automated emails in Mailchimp with the free account (Sequence Hack)

Mailchimp is a great beginner’s marketing tool. It has evolved from Email Marketing to Landing Pages and full-on Marketing Automation solutions for every price tag.

However, when looking at an automated marketing email series, we will discover that the feature requires an upgrade to the Standard or Premium plan.

Email Sequences Set Up in Mailchimp

In this post, I will show you a marketing hack on how to send nurture email streams with the free Mailchimp plan.

Automating Mailchimp email series with the free account (hack)

Mailchimp automated emails are created either in the Campaigns or Automation section. If you want to build a free email nurture workflow you will have to create multiple single email automation flows that are built on top of each other.

We will use tag trigger event-based emails.

Step-by-step on how to set up Mailchimp automation flow

  1. Set-up tags in Mailchimp

We will use tags to trigger every nurture email. If we want to send two emails we will at least need three triggers to create a scalable process.

Before we create any email in Mailchimp we need to create the tags. Let’s assume a two email series. We want to create the following tags:

  • New lead
  • Received 1st email
  • Received 2nd email

The reason behind the tags is that we use them as triggers or entry points to each automated email. Since we can’t create multiple emails in one campaign flow we need to set an event to trigger the single email automation.

  1. Create the first email for new leads

When creating the first automated Mailchimp email we will select Email subscribers when they’re tagged (Path: Create automated email – Automated – Tags):

Create an automated Mailchimp email for a nurture stream

Give your email/campaign a name, select your audience (you only have one available with the free Mailchimp plan), and begin the email draft.


  1. Set the trigger for the automated Mailchimp email

Now, we need to set the trigger to be the New Lead Tag (we created in step 1). Additionally, we want to set a delayed time for sending the email:

Select edit for the trigger settings and pick the delay (immediately for no delay, hour(s), day(s), or week(s).

Edit the tag in mailchimp to trigger an automated email
Set the tag for the mailchimp marketing hack
  1. Mailchimp Automated Emails Schedule

You can now also customize on which days the email should go out. For example, if your add someone to the campaign by assigning the New Lead tag to the contact and wait 3 days on a Thursday, the email would be sent on Sunday the same time the contact was created or updated. If you, however, adjust the schedule to only be sent on Tuesdays, Wednesdays, or Thursdays at 8:15 am, the same contact would receive the email on the next schedule. In this case, Tuesday at 8:15 am.

You can also select a time frame in which the email should go out, but why leave it up to an algorithm when you can control the sending time.

Detour: Mailchimp Automated Email Schedule Best Practices

There is plenty of research and expert insights available on what’s the best sending time is for Marketing emails. I suggest setting a time that has worked for you in the past and not limiting yourself to only one day of the week. I usually see the campaign as a whole and use different times of the day to test what’s best.

For instance, email one goes out at 8:15 am, email two at 4:45 pm, email three at 10:00 am, and email four at 12:30 pm.

If I select the same days for all four emails I can easily see which emails get the most engagement and if you have dynamic delays, you will also gather insights about sending times of each day. Of course, it can be that one email performs better than another regardless of sending time and day but it’s the fastest way to gather the most data.

I usually don’t send emails on Monday’s but I do include weekends for some emails. In fact, depending on the content I send out some emails only on weekends.

For Friday’s it’s best to send emails in the morning, for weekends, however, in the late afternoon or evening.

Time zones: If you don’t know the recipient’s time zone you need to plan for this. Plan for the best time for the majority of your leads.

  1. Filter by segment or tag

We can leave this as “none” because we don’t have different audiences. If you create more complex nurture streams like sending an eBook to everyone who downloaded a white paper, but to anyone else, you can use those filters to add more complexity to your automation. Anyways, we don’t need this for our simple Mailchimp email sequence.

  1. Post-send action in Mailchimp Email Sequences (very important)

This step is very, very, very important for the stream to work. Yet, it’s super easy and really the only trick to build a Mailchimp automated email nurture stream with the free plan. Simply, assign the second tag “Received 1st Email” as a post-send action.

When editing the post-send action you have multiple choices of what to do. You don’t need to worry about removing a tag, we simply add one additional that will trigger the next automated email in Mailchimp.

Post automation tag to trigger the next automated email in mailchimp

Now, you can review your settings, and design your email. I will not go into the step-by-step how to create an email from campaign templates. When you are done and ready to create the second email move on to step 7 in this guide.

Review the automated email settings in mailchimp
  1. Triggering the second email in your nurture stream

In the free Mailchimp marketing plan, we can’t add a second email to the automated email sequence so we will have to create a second automated email. Basically, we go through the entire process again and just adjust the trigger, schedule, and post-send action.

Trigger: We choose the trigger that a contact was tagged with “Received 1st Email”. Set the delay between the first and second emails.

Schedule: Choose a scheduled time that makes sense for you. I suggest testing a different time than the previous email.

Post-send action: Add another tag “Received 2nd Email”

A voilà:

Adding a second automated email to mailchimps free nurture stream
  1. Repeat the process for every additional email

The same logic applies to every additional email you plan to automate with Mailchimps free plan hack.

How to get subscribers into Mailchimp with a tag?

Regardless of which CRM or forms you use on your website, you need to ensure that a tag is added to the new contact. Zapier’s Marketing API is a great solution for that. You can also use hidden fields in your forms but usually, they are tricky to match with Mailchimp tags.

Using Zapier to add tags to Mailchimp contacts for automated emails

You can sign-up for a free Zapier account and create up to 5 “Zaps” (automated integrations) to sync over contacts to Mailchimp’s automation flow. First, you need to have your Mailchimp marketing account, audience within the account, and the first tag “New Lead”.

In Zapier, create a Zap with whatever CRM or form solution you use as a trigger (if applicable in Zapier, but they have so many, I’m sure they will have it).

Action: Add/Update Subscribers in Mailchimp

(Example trigger is a HubSpot form submission – Tip: this works with the HubSpot free version, too)

Using Zapier to add trigger tags to mailchimp subscribers

Setting up the Mailchimp action in Zapier

Choose App and Event: Mailchimp – Add/Update Subscriber

Choose Account: Log into your Mailchimp account

Set-Up Action:

  • Audience: You can only select your one available audience in the free Mailchimp plan
  • Email: the email address is required to create or update a subscriber/contact in Mailchimp
  • Double opt-in: This is a little tricky. If you have Mailchimp as your only email marketing tool then you can choose here True or False but if you also use another tool like HubSpot this might be double. If you select True in Zapier, it will trigger an email from Mailchimp to the contact for her to confirm the subscription. If you have the consent or opt-in otherwise, leave this to “False”.
  • Update existing: Yes – especially if you also sync contacts over from HubSpot or other tools.
  • Tags: IMPORTANT Select the “New Lead” tag
Assign subscribers mailchimp tags through zapier

Test action, save & activate Zap

After testing the action, activate the Zap. Don’t worry about delays due to the free Zapier version because we have a sending delay within the emails anyways. If you want to trigger an immediate response to leads like a confirmation or thank you message, I suggest you don’t use Mailchimp in this case and use your CRM or signup form solution for this. However, this can also be done with our free Mailchimp hack. Simply, set the delay to immediately, schedule to any day, and time as soon as possible within the Mailchimp email settings.

Now you have a fully automated nurture stream within your free Mailchimp plan to grow your audience, deliver industry trends, product updated, or send out transactional emails. The sky is the limit.